Supply Chain Monitoring
You can use Supply Chain Monitoring area of the Company Control Panel to configure the Supply Chain Monitoring platform for the whole company.
You can use the Settings page to configure settings for the Supply Chain Monitoring platform.
In the Account Admin, in the Company Control Panel menu, in the Supply Chain Monitoring area, click Settings.
The Settings page appears.
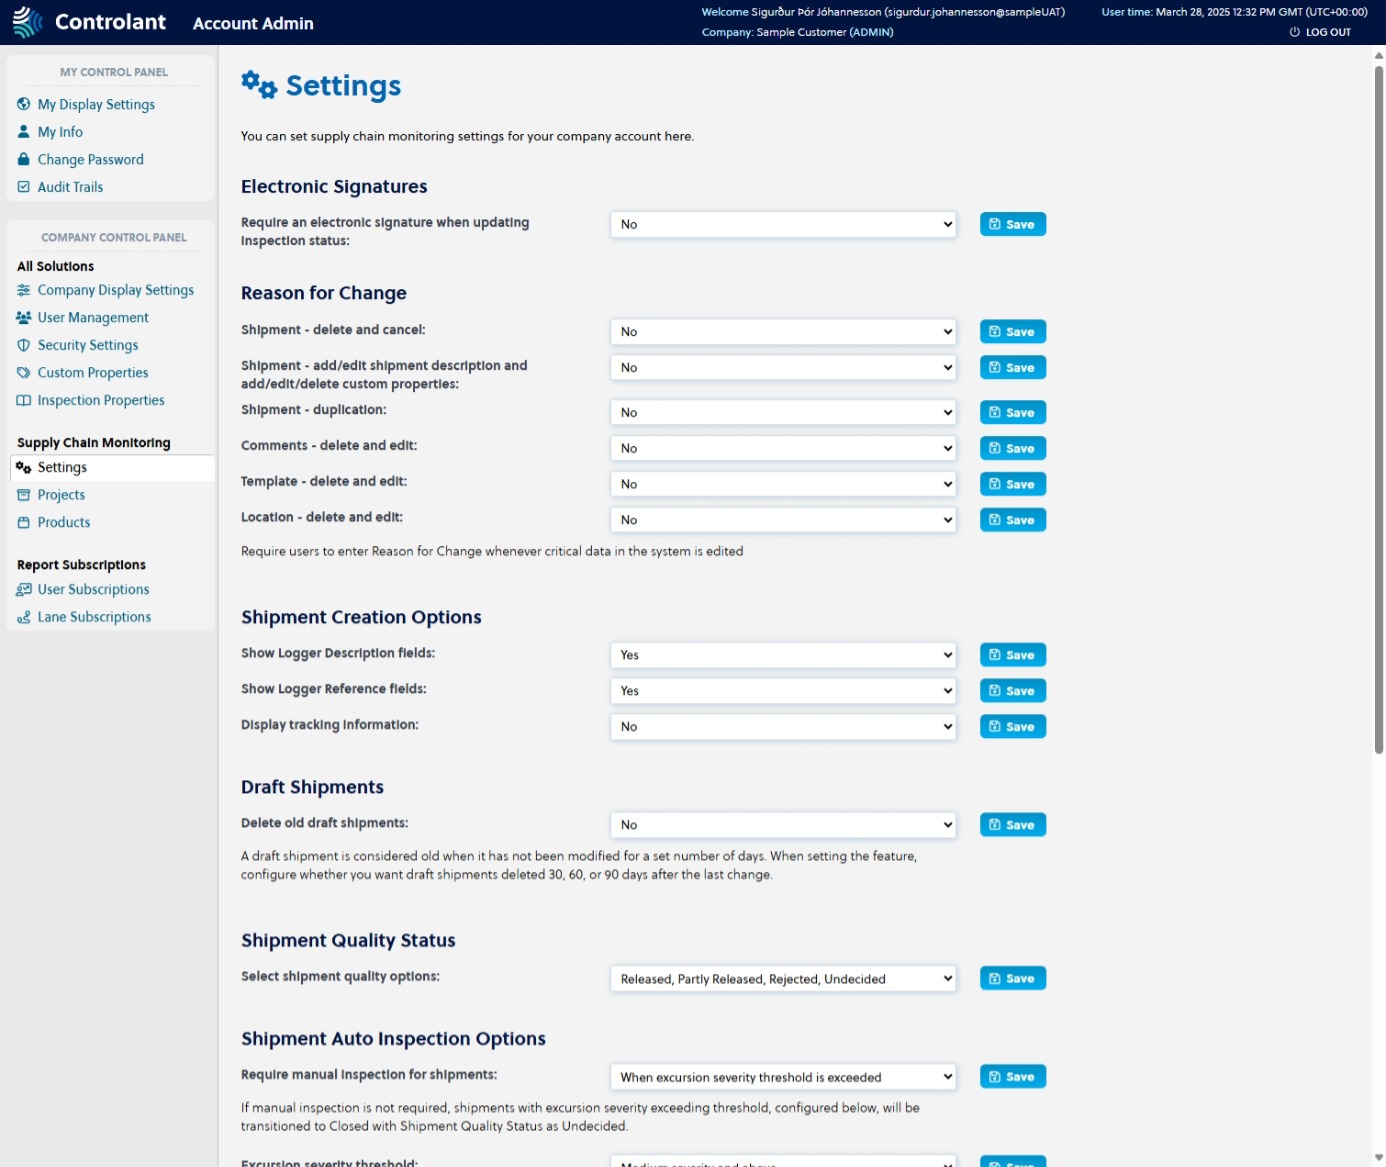
You can configure the following settings for Supply Chain Monitoring:
You can configure whether you want to require an electronic signature when updating the inspection status of shipments.
This means the user is required to re-enter the password and provide a reason for the operation performed as a reason for change.

Configuring Electronic Signatures
In the Settings page, in the Electronic Signatures are, do one of the following:
If you want to require users to provide an electronic signature when updating the inspection status of shipments, in the Require an electronic signature when updating inspection status list, click Yes.
If you do not want to require users to provide an electronic signature when updating the inspection status of shipments, in the Require an electronic signature when updating inspection status list, click No.
Click Save.
You can configure whether you want to require an electronic signature when updating the inspection status of shipments. This means the user is required to re-enter the password and write in a text box the reason for the operation performed.
Note
Having an explanation for the reason a change was made to a shipment can be useful for traceability and compliance.
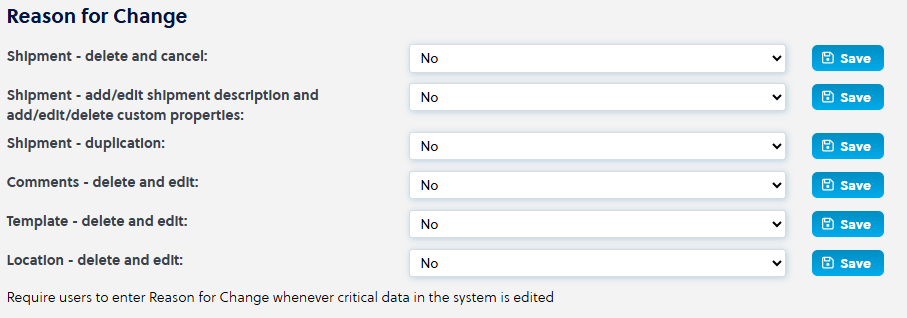
Configuring Reason for Change
In the Settings area, in the Reason for Change area, do one or more of the following:
To configure whether to require users to provide a reason for the change when deleting or canceling a shipment, do one of the following:
If you want to require users to provide a reason for the change, in the Shipment - delete and cancel list, click Yes.
If you do not want to require users to provide a reason for the change, in the Shipment - delete and cancel list, click No.
Click Save.
To configure whether to require users to provide a reason for the change when adding/editing shipment descriptions or adding/editing/deleting custom properties for a shipment, do one of the following:
If you want to require users to provide a reason for the change, in the Shipment - add/edit shipment description and add/edit/delete custom properties list, click Yes.
If you do not want to require users to provide a reason for the change, in the Shipment - add/edit shipment description and add/edit/delete custom properties list, click No.
Click Save.
To configure whether to require users to provide a reason for the change when duplicating a shipment, do one of the following:
If you want to require users to provide a reason for the change, in the Shipment - duplication list, click Yes.
If you do not want to require users to provide a reason for the change, in the Shipment - duplication list, click No.
Click Save.
To configure whether to require users to provide a reason for the change when they delete or edit comments, do one of the following:
If you want to require users to provide a reason for the change, in the Comments - delete and edit list, click Yes.
If you do not want to require users to provide a reason for the change, in the Comments - delete and edit list, click No.
Click Save.
To configure whether to require users to provide a reason for the change when deleting or editing templates, do one of the following:
If you want to require users to provide a reason for the change, in the Template - delete and edit list, click Yes.
If you do not want to require users to provide a reason for the change, in the Template - delete and edit list, click No.
Click Save.
To configure whether to require users to provide a reason for the change when deleting or editing locations, do one of the following:
If you want to require users to provide a reason for the change, in the Location - delete and edit list, click Yes.
If you do not want to require users to provide a reason for the change, in the Location - delete and edit list, click No.
Click Save.
You can configure whether you want to include the following information when creating a shipment:
device description fields
device reference fields
tracking information

Configuring Shipment Creation Options
In the Settings area, in the Shipment Creation Options area, do one or more of the following:
To configure whether to allow users to provide an optional device description when creating a shipment, do one of the following:
Note
You can use the device description to describe the location of a device in a shipment, e.g. pallet number, placement within a container, etc. The information entered into the Show Logger Description text box is available in Share Shipment, as well as on the device placement sheet.
If you want to allow users to provide a device description, in the Show Logger Description fields list, click Yes.
If you do not want to allow users to provide a device description, in the Show Logger Description fields list, click No.
Click Save.
To configure whether to allow users to provide an optional device reference when creating a shipment, do one of the following:
Note
You can use the device reference to describe the location of a device in a shipment, e.g. pallet number, placement within a container, etc. The information entered into the Show Logger Description text box is available in Share Shipment, as well as on the device placement sheet.
If you want to allow users to provide a device description, in the Show Logger Reference fields list, click Yes.
If you do not want to allow users to provide a device description, in the Show Logger Reference fields list, click No.
Click Save.
To configure whether to include display tracking information when creating a shipment, do one of the following:
Note
You can use the display tracking information to do something?
If you want to include display tracking information, in the Display tracking information list, click Yes.
If you do not want to include display tracking information, in the Display tracking information list, click No.
Click Save.
You can configure whether you want the system to delete draft shipments if they have not been modified for a set number of days.

Note
A draft shipment is considered old when it has not been modified for a set number of days. You can configure the system to delete draft shipments 30, 60, or 90 days after the last change.
Configuring Draft Shipments
In the Settings page, in the Draft Shipments area, to configure whether to want the system to delete draft shipments after a set amount of time, do one of the following:
If you do not want the system to delete draft shipments after a set amount of time, in the Delete old draft shipments list, click No.
If you want the system to delete draft shipments if they have not been modified for 30 days, in the Delete old draft shipments list, click After 30 days.
If you want the system to delete draft shipments if they have not been modified for 60 days, in the Delete old draft shipments list, click After 60 days.
If you want the system to delete draft shipments if they have not been modified for 90 days, in the Delete old draft shipments list, click After 90 days.
Click Save.
You can configure the shipment quality options to use in the Supply Chain Monitoring platform. You can select between two sets of quality statuses:
Item | Description |
|---|---|
Three statuses |
|
Four statuses |
|
Note
Updating the quality status configuration will apply to all shipments inspected after the changes. Updating the configuration will not impact closed shipments.

Configuring Shipment Quality Status
In the Settings page, in the Shipment Quality Status area, to configure which set of quality statuses you want the system to use, do one of the following:
If want the system to use three quality statuses, in the Select shipment quality options list, click Good, Bad, Undecided.
If want the system to use four quality statuses, in the Select shipment quality options list, click Released, Partly Released, Rejected, Undecided.
Click Save.
You can configure options for auto inspection of shipments. You can configure the following:
Whether to require manual inspection for shipments:
when excursion severity threshold is exceeded
never
Note
If you set this option to Never, shipments with excursion severity exceeding the threshold configured below, will be transitioned to Closed status with Shipment Quality Status as Undecided.
excursion severity threshold
Excursion severity threshold is used by the Supply Chain Monitoring platform to determine shipment quality and when to raise a visual alarm on the device.
low severity and above
medium severity and above
high severity
Resend shipment report after manual inspection
Configures whether to automatically resend the shipment quality report for shipments that require manual inspection after manual inspection has been performed and the shipment closed. You can select the following options:
resend
do not resend
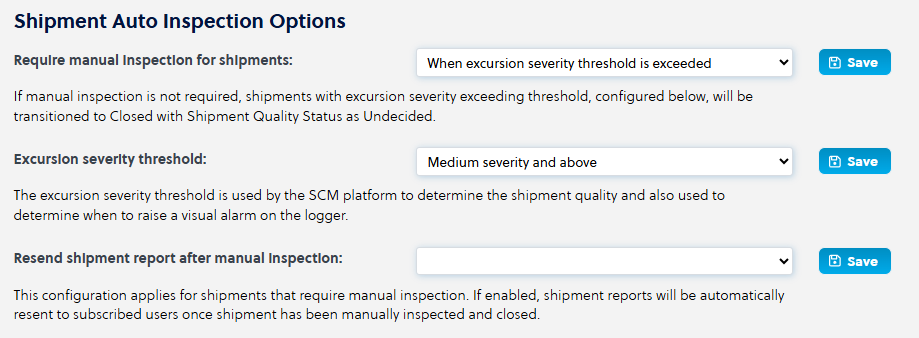
Configuring Shipment Auto Inspection Options
In the Settings area, in the Shipment Auto Inspection Options area, do one or more of the following:
To configure when to require manual inspection of shipments, do one of the following:
If you want to require manual inspection of shipments users when excursion severity threshold is exceeded, in the Require manual inspection for shipments list, click When excursion severity threshold is exceeded.
If you do not want to require users to provide a reason for the change, in the Require manual inspection for shipments list, click Never.
Click Save.
To configure the excursion severity threshold for shipments, do one of the following:
If you want to set the excursion severity threshold to low, in the Excursion severity threshold list, click Low severity and above.
If you want to set the excursion severity threshold to medium, in the Excursion severity threshold list, click Medium severity and above.
If you want to set the excursion severity threshold to high, in the Excursion severity threshold list, click High severity.
Click Save.
To configure whether to resend shipment reports after shipments that required manual inspection have been inspected and closed, do one of the following:
If you want to resend shipment reports after manual inspection, in the Resend shipment report after manual inspection list, click Yes.
If you do not want to resend shipment reports after manual inspection, in the Resend shipment report after manual inspection list, click No.
Click Save.
You can configure the following options for what to include in reports sent to subscribers. For more information about how to add, view, and add edit subscriptions, see Report Subscriptions.
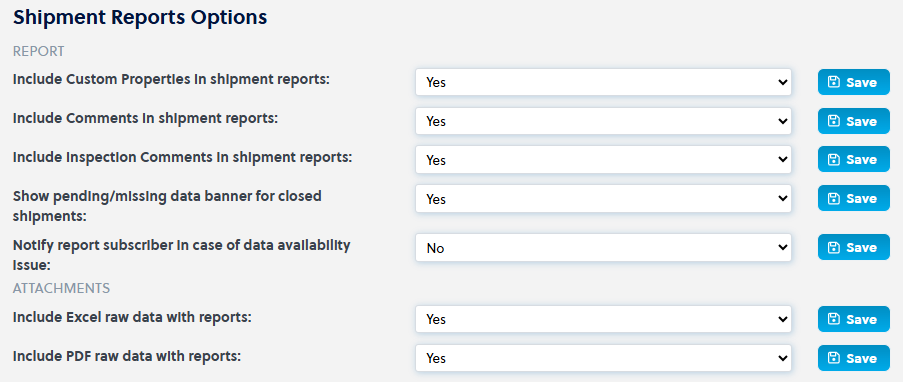
Include custom properties in shipment reports - you can include any custom properties defined for a shipment in the shipment report. For more information, see Custom Properties.
Include comments in shipment reports - you can include any comments made on a shipment in the shipment report.
Include inspection comments in shipment reports - you can include any comments made during manual inspections of shipment in the shipment report.
Show pending/missing data banner for closed shipments - you can include a banner indicating there is pending/missing data for the shipment.
Notify report subscriber in case of data availability issue - you can configure the system to send report subscribers a separate notification in case of a data availability issue.
Include Excel raw data with reports - you can include the raw data about the shipment in an attachment in Excel file format. This includes all data measurements from all devices assigned to a shipment.
Include PDF raw data with reports - you can include the raw data about the shipment in an attachment in PDF file format. This includes all data measurements from all devices assigned to a shipment.
Configuring Shipment Reports Options
In the Settings area, in the Shipment Reports Options area, do one or more of the following:
To configure whether to include custom properties in shipment reports, do one of the following:
If you want to include custom properties, in the Include Custom Properties in shipment reports list, click Yes.
If you do not want to include custom properties, in the Include Custom Properties in shipment reports list, click No.
Click Save.
To configure whether to include comments in shipment reports, do one of the following:
If you want to include comments, in the Include Comments in shipment reports list, click Yes.
If you do not want to include comments, in the Include Comments in shipment reports list, click No.
Click Save.
To configure whether to include inspection comments in shipment reports, do one of the following:
If you want to include inspection comments, in the Include Inspection Comments in shipment reports list, click Yes.
If you do not want to include inspection comments, in the Include Inspection Comments in shipment reports list, click No.
Click Save.
To configure whether to show a pending/missing data banner for closed shipments, do one of the following:
If you want to show a pending/missing data banner, in the Show pending/missing data banner for closed shipments list, click Yes.
If you do not want to show a pending/missing data banner, in the Show pending/missing data banner for closed shipments list, click No.
Click Save.
To configure whether to notify report subscriber in case of data availability issues, do one of the following:
If you want to notify report subscriber in case of data availability issues, in the Notify report subscriber in case of data availability issue list, click Yes.
If you do not want to notify report subscriber in case of data availability issues, in the Notify report subscriber in case of data availability issue list, click No.
Click Save.
To configure whether to include Excel raw data with reports, do one of the following:
If you want to include Excel raw data, in the Include Excel raw data with reports list, click Yes.
If you do not want to include Excel raw data, in the Include Excel raw data with reports list, click No.
Click Save.
To configure whether to include PDF raw data with reports, do one of the following:
If you want to include PDF raw data, in the Include PDF raw data with reports list, click Yes.
If you do not want to include PDF raw data, in the Include PDF raw data with reports list, click No.
Click Save.
You can configure projects for the Supply Chain Monitoring platform.
In the Account Admin, in the Company Control Panel menu, in the Supply Chain Monitoring area, click Projects.
The Projects page appears.
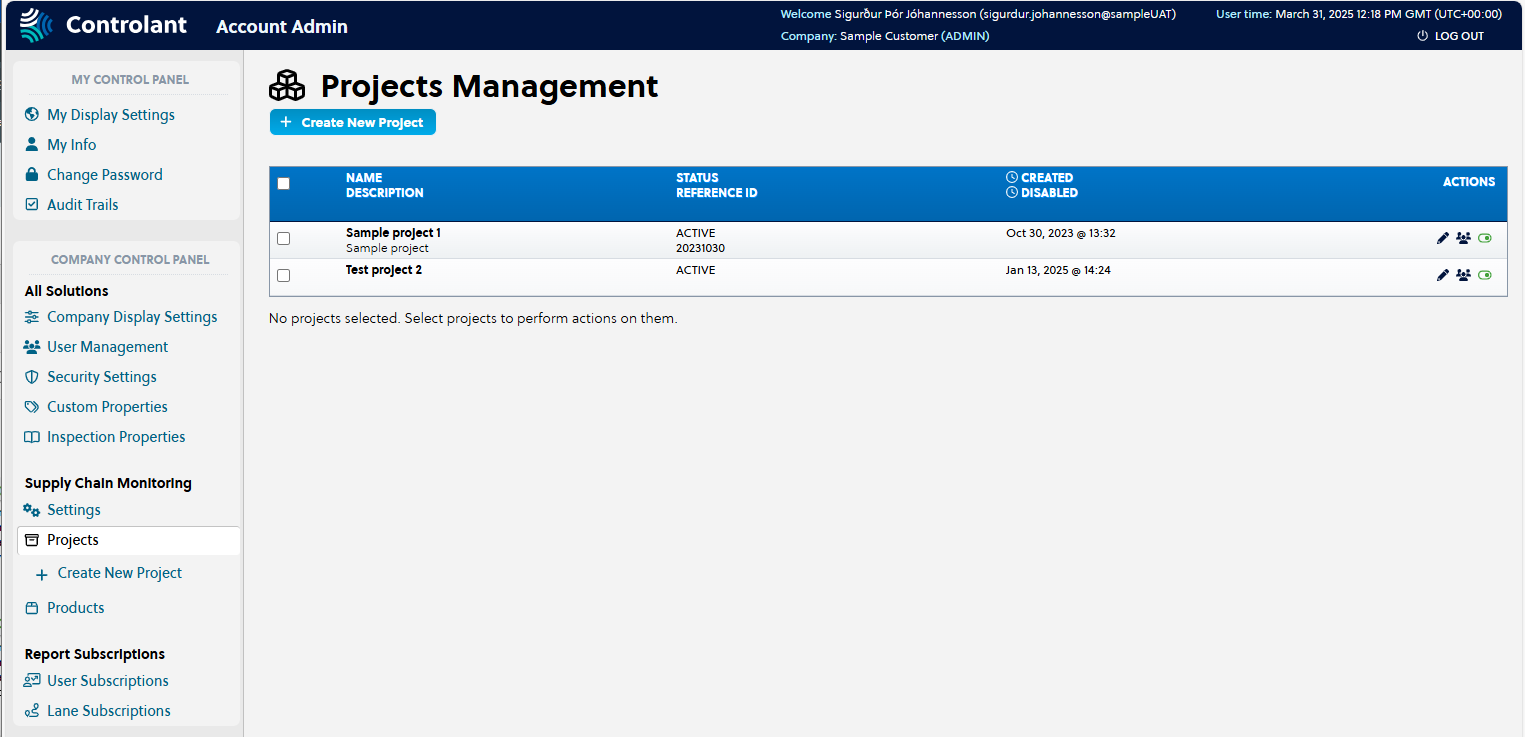
Note
Disabled projects appear grayed out.
Item | Description |
|---|---|
Selection | Click to select project. |
Name Description |
|
Status Reference ID |
|
Created Disabled |
|
Actions | Actions you can take on the project:
|
To create a new project, click + Create New Project.

The Create New Project page appears.
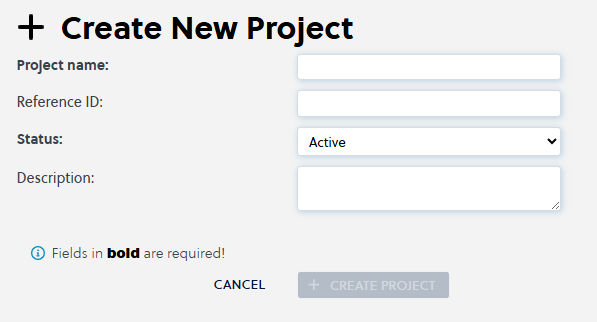
In the Project name box, type the name for the project.
If you want to include a project reference, in the Reference ID box, type the reference ID for the project.
To configure whether the project should be active, do one of the following:
If you want the new project to be active, in the Status list, click Active.
If you want the new project to be inactive, in the Status list, click Disabled.
If you want to include a project description, in the Description box, type the description for the project.
Click + Create Project.

The Projects page appears, with the new project in the list of Active Projects.
To modify a project, in the Projects list, locate the project you want to modify and click
 .
.The Edit Project page appears.
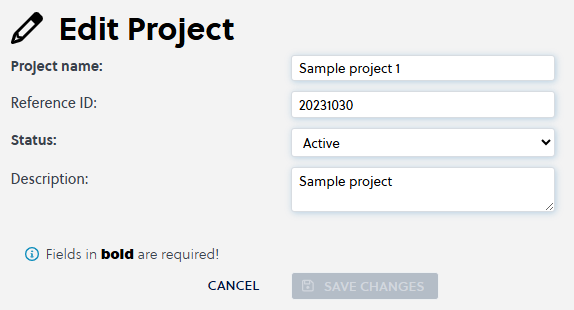
To modify the project, do one or more of the following:
If you want to modify the project reference, in the Project name box, type the new name for the project.
If you want to modify the project reference, in the Project reference box, type the new reference for the project.
If you want to modify whether the project should be active, do one of the following:
If you want the new project to be active, in the Status list, click Active.
If you want the new project to be inactive, in the Status list, click Disabled.
If you want to modify the project description, in the Description box, type the new description for the project.
Click Save changes.

The Projects page appears.
To change user access to a project, in the Projects list, locate the project you want to modify and click
 .
.The Edit Project Access page appears.

If you want to grant users access, for each user you want to add, in the Add Users to Project list, do the following:
Start typing the name or username of the user.
When you see the user you want to add, click the user.
The user is added to the Add Users to Project list.
Click Add Selected Users.

The Edit Projects Access page appears, showing a list of users with access to the selected project in the added to the Users with Access table.
If you want to remove access from a user, in the Users with Access table, locate the user and in the Actions column, click
 .
.The user is removed from the Users with Access table.
If you want to disable a project, in the Projects list, do the following:
Locate the project you want to disable and click
 .
.A confirmation window appears.
Click OK.
The Projects page appears; the disabled project is removed from the Active Projects list.
If you want to enable a project, do the following:
To view the list of disabled projects, click + Show Disabled Projects.

The Disabled Projects list appears.
Locate the project you want to enable and click
 .
.The Projects page appears; the enabled project is now in the Active Projects list.
You can view products that have been configured for the Supply Chain Monitoring platform.
In the Account Admin, in the Company Control Panel menu, in the Supply Chain Monitoring area, click Product.
The Products page appears.


